
Ice Skate Sharpening Guide: How Often, How to Tell They're Dull & Everyday Blade Care
Learn how to tell if ice skates are dull, when to sharpen them, what blade hollows mean, and how to prevent rust and odor with simple skate-care tips.
Introduction
If you own ice skates, you will need to sharpen them — and you will need to look after the blades between sharpenings. This guide explains how to tell when skates need sharpening, how to check whether a blade is actually sharp, how often different skates need sharpening, what a blade hollow is, and the simple care routine that keeps blades from rusting.
It is written for recreational skaters, parents, hockey players, and figure skaters who own their skates. You do not need any technical background. Where a term is technical, it is explained in plain English the first time it appears.
Two things to know before you start:
- There is no single sharpening schedule that is right for everyone. How often you sharpen depends on how much and how hard you skate, the ice you skate on, and the hollow you use. This guide gives ranges and the signs to watch for, not a calendar rule.
- Home care is drying, guarding, and deburring — not sharpening. Only a sharpening machine can restore the hollow in a blade or make its two edges level. Stones and strops help you maintain an edge between sharpenings; they do not replace a machine.
Related guides: How to Choose and Lace Ice Skates for fit and lacing, and the First-Visit Ice Skating Checklist for what to bring and rink etiquette.
Quick reference
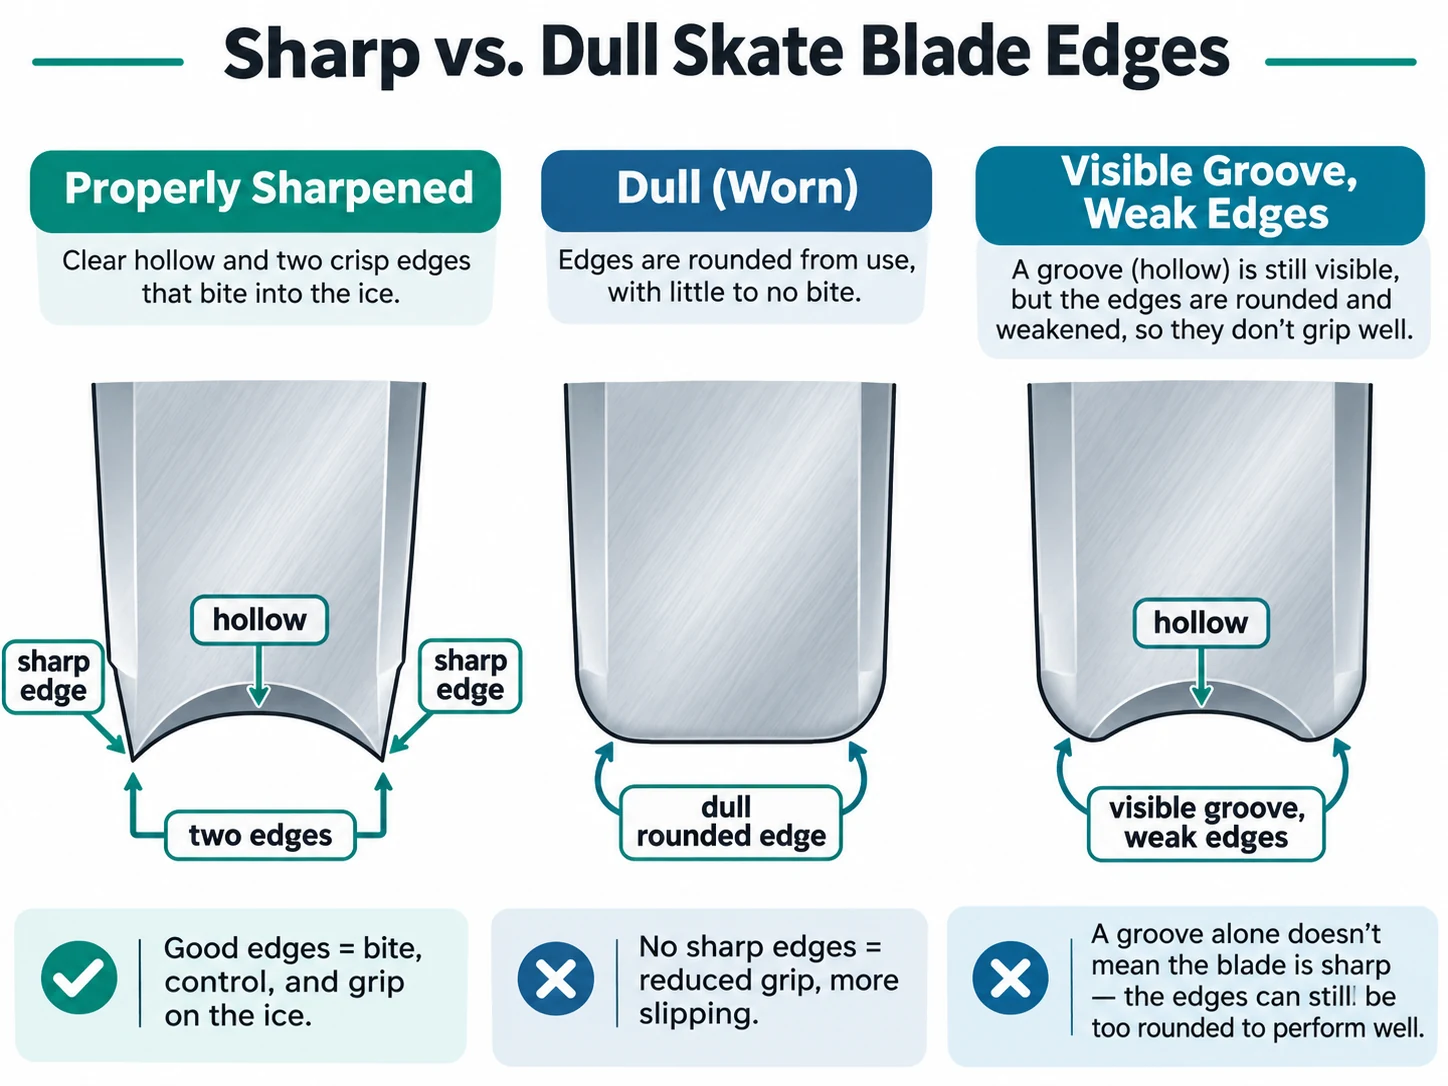
- Dull skates: you slip or wash out in turns and stops, edges will not hold, or you see nicks, rust, or a smooth, rounded edge. A fingernail may lightly catch on a sharp edge, but the test is not definitive — burrs and other blade conditions can affect the result; if the nail slides smoothly, the edge is likely dull.
- How often: competitive hockey every 2–3 hours on the ice; adult hockey about every 6–8 hours; youth hockey 10–15 hours; recreational skaters 15–30 hours; figure skaters 20–40 hours. Count your hours and watch for slipping — there is no single schedule for everyone.
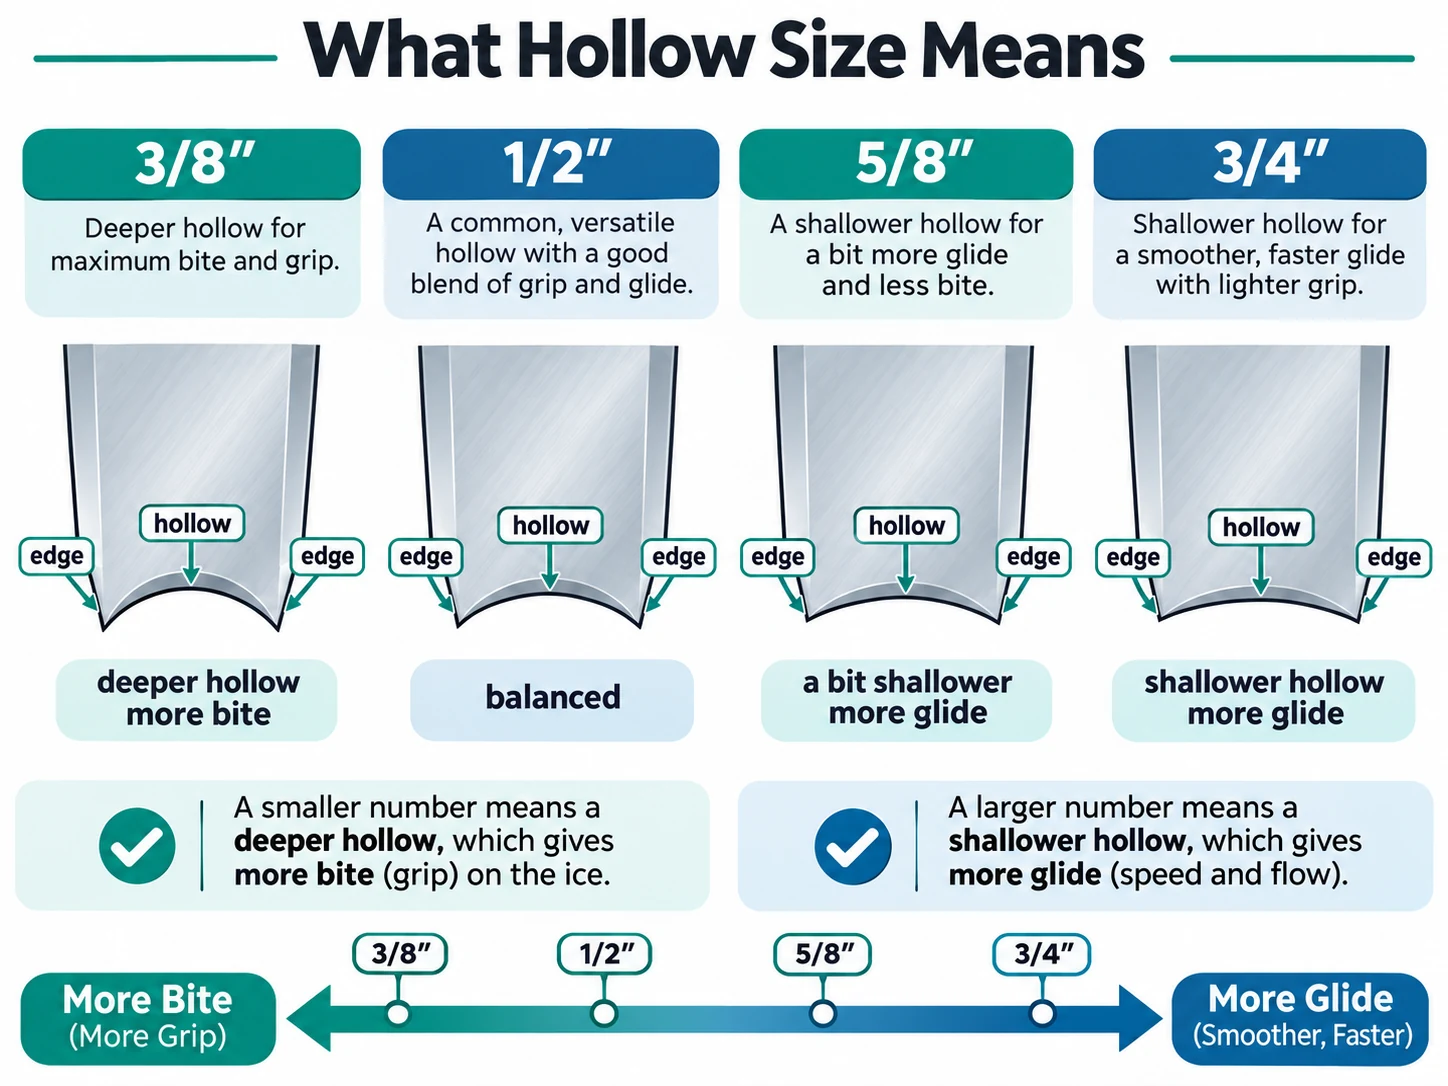
- The hollow: the concave groove in the bottom of the blade that creates two edges. 1/2" is the common starting point (hockey); 7/16" for figure. A smaller number (3/8") means a deeper hollow with more grip and less glide; a larger number (5/8") means a shallower hollow with more glide and less grip.
- Home care: remove hard guards at the bench, towel-dry the blades and holders, wipe again as condensation forms, put dry soft soakers on for transport, and air the skates out at home. Never store blades wet in hard guards or a sealed bag.
Contents
- Introduction
- IceRinkGuide Skate Blade Troubleshooting Guide
- 60-Second Skate Blade Inspection
- 1. How do I know if my ice skates need sharpening?
- 2. How can I tell if a skate blade is actually sharp?
- 3. How often should I sharpen my skates?
- 4. What is a blade hollow, and what do 1/2", 5/8", and 3/8" mean?
- 5. What are blade profile and rocker?
- 6. Are hockey skates and figure skates sharpened differently?
- 7. What do professional sharpening machines do?
- 8. What can I safely do at home without a sharpening machine?
- 9. Honing stones, deburring stones, rubber stones, leather strops, and polishing tools
- 10. How do I maintain blades between sharpenings?
- 11. How do I dry blades and prevent rust?
- 12. How do I clean skate boots and control odor?
- 13. A simple 5-minute after-skating routine
- FAQ
- Sources and Further Reading
IceRinkGuide Skate Blade Troubleshooting Guide
If your skates are not behaving the way they should, start here. These are possible explanations, not definitive diagnoses — a technician who can see and feel the blades is the only person who can confirm what is wrong. Do not keep skating on blades that feel unsafe or unstable; have them checked before your next session.
| What you notice | Possible explanation | What to do next |
|---|---|---|
| Skates slip in turns or stops | Worn edges, a hollow that does not suit you, or technique and ice conditions | Inspect the blades in good light. Ask a technician to check the edges and confirm the hollow. |
| The blade still has a groove but will not grip | The hollow can remain visible after the two edges become rounded | Have the edges checked rather than judging by the groove alone. A visible hollow does not prove the edges are sharp. |
| One edge grips while the other slips | Possible uneven edges or localized damage | Ask a technician to check edge level. Do not try to correct uneven edges with a hand stone. |
| Skates feel excessively grabby | The hollow may be too deep for the skater or the ice conditions | Discuss a shallower hollow with a qualified sharpener. |
| One small section feels rough or catches a nail | Possible burr or nick, not necessarily a properly sharpened edge | Inspect the spot in good light. Deburr only a minor burr; seek professional assessment when uncertain. |
| Rust appears after storage | Moisture may be trapped in guards, soakers, or a closed bag | Dry the blades completely and ventilate the equipment. Do not store blades wet in hard guards or a sealed bag. |
60-Second Skate Blade Inspection
A quick check you can do at the bench before you skate. It helps you spot a problem early; it does not guarantee a blade is correctly sharpened or that its edges are level.
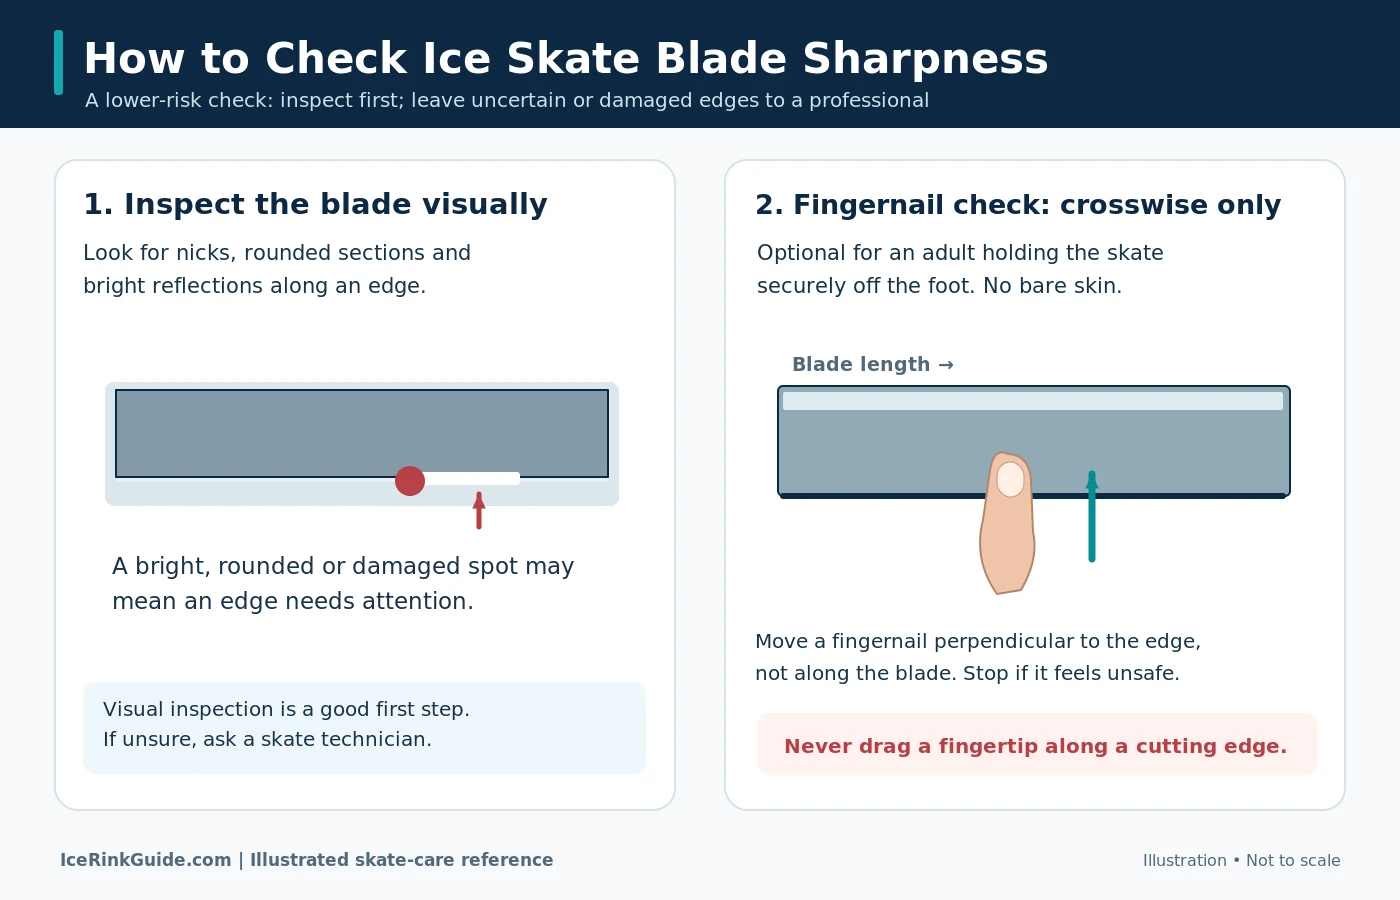
- Look at both edges in good light. Hold the skate so light falls across the blade. Look for shiny rounded sections, nicks, and rust.
- Remember that a visible hollow does not prove the edges are sharp. The groove can still be there after the edges have rounded off. Judge the edges, not the groove.
- Try the optional crosswise fingernail test. With the skate off your foot, drag a fingernail across (not along) each edge at a few spots. A fingernail may lightly catch on a sharp edge, but the test is not definitive — burrs and other blade conditions can affect the result; a nail that slides smoothly suggests the edge is dull. Never test with bare fingertips, and never slide skin along a cutting edge.
- Compare both edges. Check that the two edges look and feel consistent — one edge should not be visibly higher, rougher, or more worn than the other.
- If the blade feels unsafe, damaged, or inconsistent, get a professional inspection. Do not skate on a blade you do not trust. A sharpener can check edge level and confirm whether the blade needs work.
For the complete explanation of what a sharp edge is and how to test it safely, see Section 2.
1. How do I know if my ice skates need sharpening?
The short answer
Your skates need sharpening when they stop gripping the ice the way they used to — you slip or "wash out" in turns and stops, your edges will not hold, or you can see or feel nicks, rust, or a smooth, rounded edge.
On the ice
Watch for these signs:
- Slipping or washing out in turns. Your skates slide sideways out of a turn instead of carving through it. Your crossovers feel unstable.
- Reduced grip in stops. You need noticeably more pressure to stop, or you skid instead of stopping cleanly.
- Edges that will not hold. You have difficulty holding an outside or inside edge, or your edge feels unstable under you.
- Jump takeoffs and landings feel uncertain (figure skaters). You skid excessively into a jump entry or wash out on a landing.
These are the signs Riedell, Blademaster, and the figure-skating guide The Mad Spinner all describe: a properly sharpened blade catches the ice on push-off, carves through corners, and glides at speed. When that grip is gone, it is time to sharpen.
Off the ice
Check your blades before every skate. Look and feel for:
- Nicks. Small chips or rough spots along the edge, often from hitting the boards, a goal post, another blade, or debris on the ice.
- Rust. Orange or brown spots, often along the edge or near the screws.
- Shiny or reflective sections. Dull sections catch and reflect light; sharp edges do not. (Nashville.gov, which runs a public rink sharpening service, describes this.)
- A flat or smooth, rounded edge. Run your eye along the blade. If the edge looks rounded or you can see it clearly, it may be dull. (See Section 2 for how to check this safely.)
- Damage from hard surfaces. Stepping on concrete, tile, or gritty floors without guards can damage an edge in a single step, regardless of how many hours you have skated. Outdoor ice and debris dull blades much faster than clean indoor ice.
A note on new sharpenings: a freshly sharpened blade can feel stiff or overly grippy for the first 15–30 minutes on the ice. That is normal and is not dullness. But if the blade feels unsafe or unstable — you cannot hold an edge, you wash out on turns and stops, or the edge catches unpredictably — stop and have it checked immediately. Do not skate a full session on a blade that feels unsafe.
2. How can I tell if a skate blade is actually sharp?
The short answer
A properly sharpened blade has two clean, level, burr-free edges. The safest way to check is the fingernail test: drag a fingernail across the edge (side to side, not along it). A fingernail may lightly catch on a sharp edge, but the test is not definitive — burrs and other blade conditions can affect the result; if the nail slides smoothly, the edge is likely dull. You can also look: a perfectly sharpened edge is almost invisible, while a dull edge is visible and reflective. When in doubt, let a professional evaluate the edge.
This is the section to read carefully. There is a lot of confident advice about testing sharpness, and some of it is unsafe or misleading.
What a properly sharpened edge is
A skate blade is not sharpened to a single knife edge. Sharpening grinds a concave groove — called a hollow — into the bottom of the blade. That groove leaves two edges: an inside edge and an outside edge. (See Section 4 for more on the hollow.)
What the animation shows: (1) Sharpening grinds a concave hollow into the bottom of the blade, creating two edges. (2) A deeper hollow gives more bite and less glide; a shallower hollow gives more glide and less bite. (3) Hand tools such as stones and strops maintain an edge but cannot restore a hollow — only a professional grinding can.
A properly sharpened blade has two edges that are:
- Razor-thin and clean. The two edges should be razor-thin, clean, and free of burrs or nicks. Sparx, which makes sharpening machines, describes a properly sharpened edge this way.
- Level. Both edges are the same height along the whole blade. If one edge is higher than the other, one catches aggressively while the other slides off, and turns, spins, and jump takeoffs suffer. Technicians check this with an edge gauge at the heel, middle, and toe. (Sparx notes that players cannot detect unevenness below 0.003 inches — so if an edge feels uneven on the ice, have it checked professionally.)
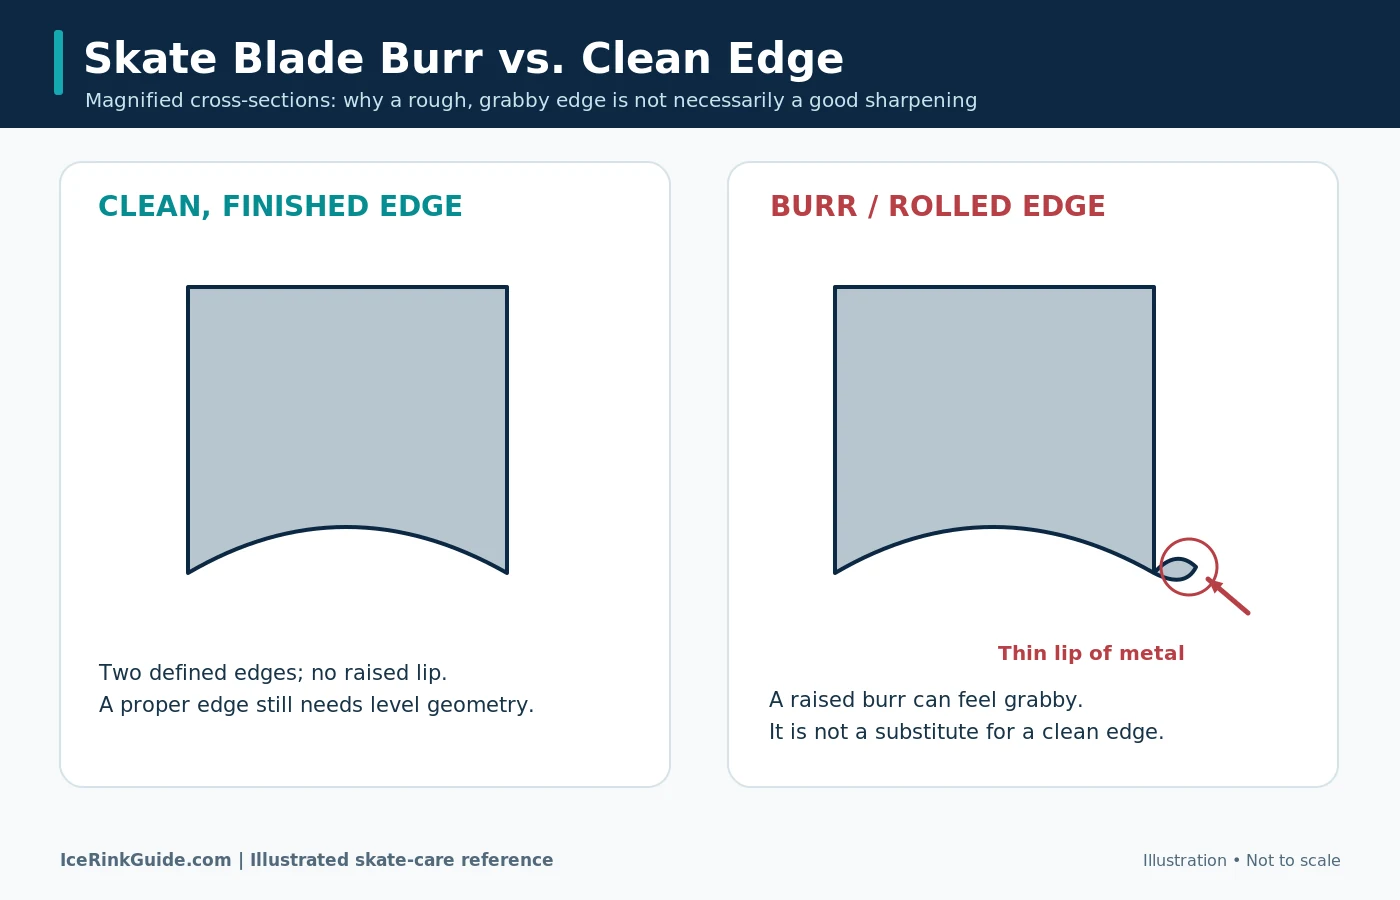
- Burr-free. A burr is a thin, raised flap of metal pushed out from the edge during grinding or by contact with a hard surface. It must be removed after sharpening. (More on burrs below.)
Having a hollow is not the same as having usable edges
This distinction matters. A blade can still have a visible hollow and yet not grip the ice — if the edges are rounded off, chipped, uneven, or covered in a burr. Conversely, a blade can have two sharp edges but the wrong hollow for you, and it will still feel terrible. Sharpness and hollow are different things, as Blademaster explains.
So do not judge a blade by the hollow alone. Judge it by whether the two edges are clean, level, and able to bite the ice.
The fingernail test (the recommended method)
This is the safest and most consistently recommended way to check sharpness. Use it with the skate off your foot, held steady.
- Hold the skate steady, blade up.
- Drag a fingernail across the edge — side to side, perpendicular to the blade, not along its length — at three to five spots along the blade.
- Test both the inside edge and the outside edge.
- If your nail catches slightly as you drag it across, the edge is present and likely sharp. If your nail slides across smoothly, as if the edge were rounded, the edge is likely dull. The test is not definitive — burrs and other blade conditions can affect whether a nail catches. Sparx describes the same test, and figure-skating sources agree.
A related variant is to lightly draw the back of a fingernail downward, perpendicular to the edge. A sharp edge may shave tiny fingernail shavings. Do not press hard, and be careful not to cut yourself.
Visual inspection
You can also check by looking. A perfectly sharpened edge is almost invisible — the edge itself does not catch the light. A dull or "lost" edge is visible: it reflects light and looks shiny or rounded.
So: if you can clearly see the edge, or if sections of it look shiny, the blade is likely dull.
What a smooth, rounded edge means
If the edge feels smooth and rounded — like the edge of a coin — and your fingernail slides over it without catching, the blade is likely dull. The edge has been worn round and can no longer bite the ice. This is sometimes called a "coin edge" in conversation. A smooth, rounded, visible edge is a dull edge.
Burrs and false sharpness
A burr can make a blade feel sharp when it is not. A burr is a thin flap of metal sticking out sideways from the edge. It can feel rough and catch your nail or finger, yet fold over or break off on the ice, leaving a dull, unpredictable edge underneath.
So if an edge feels rough or grabby in one spot only, suspect a nick or a burr, not a uniformly sharp blade. A light deburring pass (see Section 9) may fix a minor burr. If the roughness persists, or the edge still slips on the ice, the blade needs a professional sharpening.
Note: a burr can make an edge feel grabby without giving consistent grip. Treat burr presence as a sign to deburr, not as proof the blade is sharp.
Why sharpness is not only about feeling dangerous to the touch
A blade can cut skin and still skate badly — if the edges are uneven, the hollow is wrong for you, or a burr is present. And a properly sharpened blade's edge is nearly invisible. "Dangerous to touch" is neither necessary nor sufficient. What matters is whether the two edges are clean, level, burr-free, and at a hollow suited to you — and whether they bite the ice on turns and stops. A blade can be too dull, but it is the hollow and the edge condition that determine how it skates, not how dangerous it feels to touch.
A note on testing with bare fingertips
You may see advice to run a finger along the blade to feel for nicks. Some sources describe this (Bauer and Nashville.gov both mention gently feeling along the edge for nicks), while others warn against it (Adults Skate Too and Sparx advise never to run a finger along the cutting edge, and recommend the fingernail-across test instead).
Our recommendation, especially for beginners and children: do not test sharpness with bare fingertips. Use the fingernail-across test and visual inspection described above. They are safer and more reliable. If you are an experienced sharpener who feels for edge "grab," do so lightly, on the side of the blade, with the skate off your foot — never by sliding skin along or across the cutting edge. For everyone else, the fingernail test is the method to use.
When to let a professional evaluate the edge
See a sharpener or skate shop if:
- Your skates still slip after a fresh sharpening.
- One edge grabs while the other slips.
- You can see a chip, a bent blade, or deep rust or pitting.
- A blade moves, or screws will not stay tight.
- You are unsure after a fingernail or visual test.
For figure skates, go to someone who sharpens figure skates regularly (see Section 6). Jackson Ultima advises having skates sharpened by an expert you trust.
3. How often should I sharpen my skates?
The short answer
There is no single number. Competitive hockey players may sharpen every 2–3 hours on the ice; recreational skaters and many figure skaters may go 20–40 hours. The honest answer is a range by use, plus "sharpen when the signs appear" (Section 1). Count your hours, watch for slipping, and ask your sharpener or coach.
Ranges by skate type
These are guidelines from manufacturers, rinks, and skating clubs — not rules. The sources disagree with each other, and the spread is roughly tenfold. That disagreement is real, and it is why this guide does not give one number.
| Skater / skate | Guideline | Source |
|---|---|---|
| Competitive hockey (elite) | Every 2–3 hours on ice | Bauer (manufacturer) |
| Hockey / figure, general | About every 3–4 hours; at least once a week in season for an average player | Sparx (machine maker) |
| Arena hockey, rule of thumb | Every 6–8 hours of ice time (a player's game ice time is typically 15–20 minutes) | First Goal Pro Shop (independent) |
| Youth hockey / kids | Every 10–15 hours | On the Fly Edgeworks; Tydan (independent) |
| Recreational (general) | Every 15–20 hours; or at the start of the season and when dullness appears | Ice Skating Near You (independent) |
| Recreational / rink guidance | Every 20–30 hours; hockey more often | Nashville.gov (public rink) |
| Figure — beginners | Every 25–30 hours; Novice at least every 2 months; Elite varies from weeks to months | Jackson Ultima (manufacturer) |
| Figure — general | 20–40 hours between sharpenings; about 4 hours a week means every 5–10 weeks; 12 hours a week means every 2–3 weeks | The Mad Spinner (independent figure specialist) |
| Figure — learn-to-skate (club) | CanSkate about once every 10 sessions; StarSkate/advanced about once every 12–15 hours | Eganville Skating Club (club) |
| Recreational, infrequent | Once or twice a season, then only if the skates stop holding | Secondary synthesis — use cautiously |
| Rental skates | The rink's job, not yours. Swap a dull or slippery pair at the rental counter. | Ice Skating Near You; Adults Skate Too |
Why the numbers differ
Bauer and Sparx — both of which sell sharpening machines — give the most frequent intervals. Manufacturer care pages (Jackson Ultima, Riedell) and rink and club guidance give the least frequent and emphasise feel and preference. Jackson Ultima and Adults Skate Too both stress that there is no single timetable — it comes down to personal preference, and skaters and sharpeners do not all agree on the numbers.
A commercial incentive is worth noting: companies that sell sharpening machines have a reason to recommend frequent sharpening. That does not make their numbers wrong, but it is a reason to treat them as one end of a range, not as the rule.
What shortens or lengthens the interval
These factors are agreed across sources:
- Shortens it: hard or cold ice, outdoor ice and debris, heavy or aggressive skating, hard stops, contact with boards, goal posts, or concrete, dirty ice, and a deeper hollow (which wears faster).
- Lengthens it: soft or warm ice, light recreational use, good guard and drying habits, and a shallower hollow.
One secondary source claims 20 minutes on outdoor ice will render the edges pretty much unusable for arena skating. That is an extreme single-source claim, not a consensus. Outdoor ice does dull blades faster, but do not take the 20-minute figure as a rule.
New skates are a special case
Factory preparation varies by brand and model — some blades arrive with a factory sharpening, some do not, and a factory edge is not always a finished, skate-ready edge. U.S. Figure Skating's Aspire purchasing guide, written for figure skaters buying their first owned skates, notes that in its context blades come with a factory sharpening and a protective coating to prevent rusting, and it recommends an initial professional sharpening before skating on them: the in-store sharpening removes the coating and sets a grind suited to the skater's level. Other sources describe factory edges as light or shipped dull as a safety measure — Nashville.gov notes that blades as they come from the factory are usually not sharpened well, if at all, and The Mad Spinner notes that new figure skates are often shipped dull as a safety measure.
The practical advice: do not assume a new pair is ready to skate on straight out of the box. Ask the shop whether the blades have been sharpened and confirm whether a first professional sharpening is needed before first use.
The practical advice: get a first professional sharpening before first use, and ask the shop to confirm the hollow. Do not assume a new pair is ready to skate on straight out of the box.
Over-sharpening shortens blade life
Every sharpening removes steel. Sharpening more often than needed shortens blade life and can flatten the blade's rocker over time. Sharpen when the signs appear, not on a fixed date.
4. What is a blade hollow, and what do 1/2", 5/8", and 3/8" mean?
The short answer
A hollow is the concave groove ground into the bottom of the blade. It creates the two edges that grip the ice. The size is called the radius of hollow (ROH), measured in inches. A smaller number (like 3/8") means a deeper hollow with more grip and less glide. A larger number (like 5/8") means a shallower hollow with more glide and less grip. 1/2" is the common starting point for hockey; 7/16" is the common starting point for figure skating.
What the hollow is
Imagine the bottom of the blade. Instead of being flat, it has a shallow U-shaped groove running along its length. That groove is the hollow. The two raised sides of the groove are the two edges — inside and outside — that bite into the ice.
The size of the hollow is the radius of hollow (ROH): the radius of the imaginary circle whose arc forms the groove. A smaller radius makes a deeper, tighter groove. A smaller radius forms a deeper curve and a deeper hollow, creating keener edges, as Riedell explains.
Deeper versus shallower
This tradeoff is agreed across manufacturers and technical suppliers:
| Hollow | Grip / bite | Glide / speed | Feel |
|---|---|---|---|
| Deeper — smaller number, e.g. 3/8" | More bite, tighter turns, stronger stops, quicker edge response | Less glide, more friction, faster fatigue | Grippy, "grabby" |
| Shallower — larger number, e.g. 5/8", 3/4" | Less bite, harder to hold tight turns | More glide, less drag, less fatigue | Faster, freer |
Deeper hollows also wear faster and their edges are more fragile. Shallower hollows last longer between sharpenings.
Common sizes
- Hockey: 1/2" is the balanced, common starting point and often the shop default. 5/8" gives more glide. 3/8" is deeper and more aggressive. Bauer lists 1/2", 5/8", 3/4", 7/8", 1", and 1-1/4" from deep to shallow.
- Figure: 7/16" is the common starting point. 1/2" for beginners, 3/8" for advanced skaters who want more bite for jumps. Ice dance and synchro skaters often use a shallower hollow.
- Goalies: commonly shallower, 1/2" to 1" or more.
How to choose and adjust
There is no formula. Weight and ice conditions are starting-point heuristics, not rules:
- Lighter skaters often need a deeper hollow to get enough bite; heavier or stronger skaters often prefer a shallower one because body weight already creates grip. (Bauer; Blademaster.)
- Colder, harder ice is harder to dig into and may call for a deeper hollow; warmer, softer ice lets the blade dig in more and may call for a shallower one. Riedell gives temperatures: harder ice around 17–19°F needs a deeper hollow, softer ice around 20–22°F a shallower one. Other sources give slightly different ranges, so treat these as approximate.
One source disagrees with using weight as a selector: First Goal Pro Shop argues that height, weight, or position is not a good indicator and that ice conditions matter more, recommending that skaters try hollows and choose by feel. Present weight as a starting point, verified by feel — not as a formula.
To adjust: change one step at a time (for example, 1/2" to 5/8"), skate on it, and note how turns, stops, glide, and fatigue feel. Keep notes so you can compare.
"Too sharp" usually means the hollow is too deep
If your skates feel grabby or hard to control after sharpening, the problem is usually not that the edges are "too sharp." Sparx notes that edges can never be too sharp — only the hollow can be too deep. The fix is a larger (shallower) hollow, not duller edges. Other sources describe the same "too sharp" or grabby feeling as a real problem, but they point to the same fix: go shallower.
5. What are blade profile and rocker, and how are they different from sharpening?
The short answer
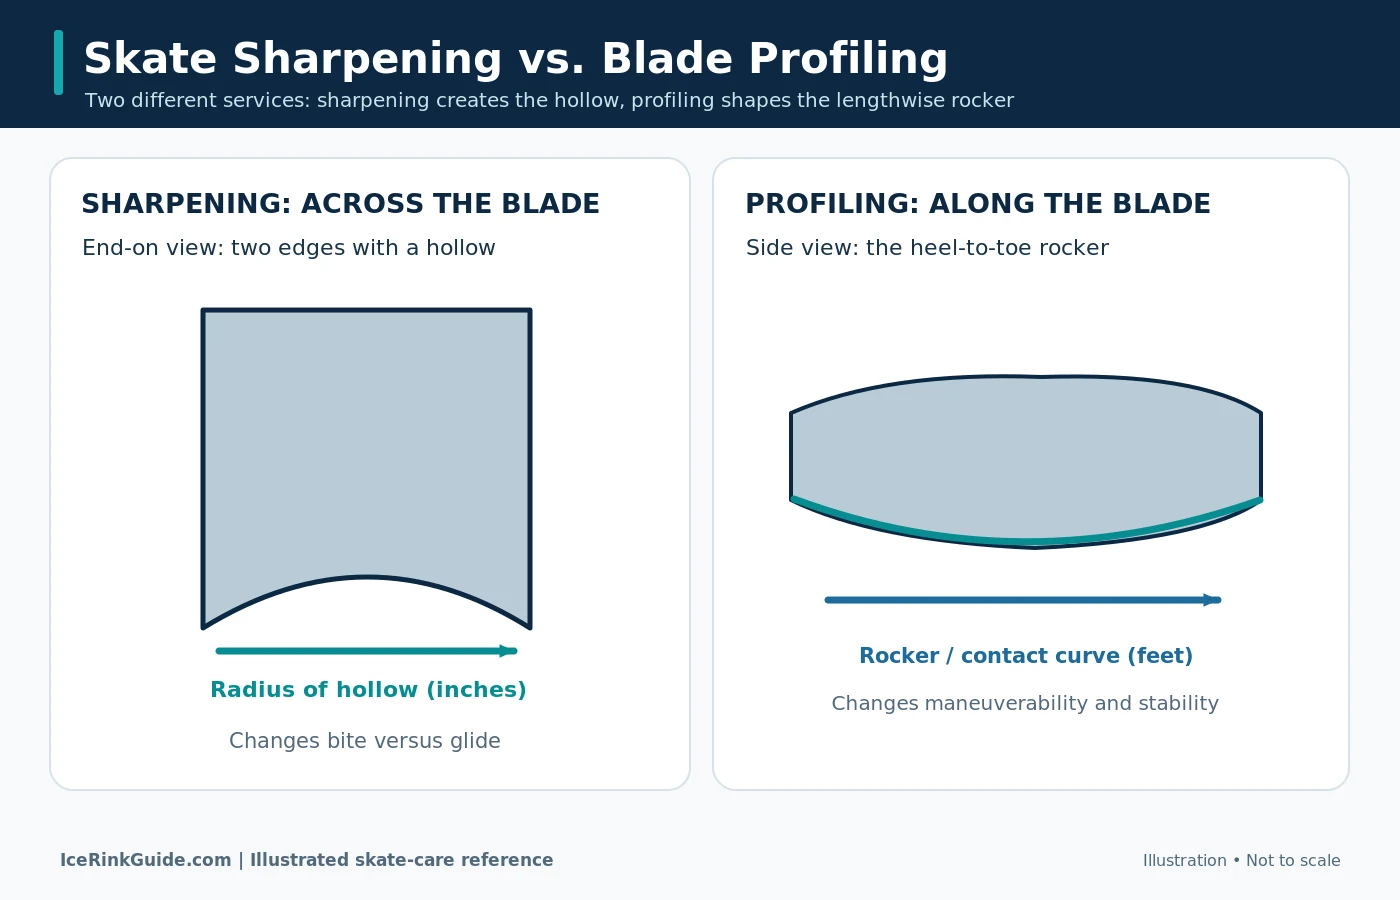
Sharpening works across the width of the blade (the hollow, measured in fractions of an inch). Profiling works along the length of the blade — the rocker, the heel-to-toe curve, measured in feet. The rocker decides how much steel touches the ice and where your balance point sits. Profiling is not routine sharpening, and it is not something most skaters need often.
Profile and rocker, in plain English
Look at a skate blade from the side. It is not flat along its length — it curves gently, like the bottom of a rocking chair. That curve is the rocker. The radius of that curve is the profile (also called the contour), measured in feet. Common profile radii are 9 feet, 11 feet, and 13 feet.
- A smaller profile radius (for example, 9 feet) means a tighter curve, so less blade touches the ice (about 1.5 inches). That gives tighter turns and quicker pivots, and more agility.
- A larger profile radius (for example, 11–13 feet) means a flatter curve, so more blade touches the ice (about 2–3 inches). That gives more stability and straight-line speed.
Sharpening versus profiling
Blademaster states the distinction clearly: sharpening restores the edges of the blade and creates the desired radius of hollow, while profiling changes the blade's overall shape (rocker) to influence how the skate performs on the ice. The two services work together but serve different purposes.
In short: sharpening is about the edges; profiling is about the shape of the blade along its length.
How often does a profile need attention?
Profiling is not routine, and there is no universal profiling schedule. Blademaster notes that most skaters do not need frequent profiling: once the desired profile is established, it can typically be maintained over the life of the blade, and reprofiling is generally only needed when changing profiles, replacing steel, or correcting significant blade wear.
That said, do not assume a profile lasts unchanged for the blade's entire lifetime. Routine sharpening should preserve the profile, but sharpening removes steel, and over many sharpenings the profile can change — especially if sharpening is done by hand without care. Bauer warns that manual sharpening can alter a profile, and presents this as an argument for automated sharpening; treat that specific claim as Bauer's, not as independently verified. Beginners do not need custom profiling; restoring the factory profile is enough for most players.
If you are changing your profile, replacing steel, or correcting significant wear, talk to a qualified technician. Do not attempt to change a profile at home.
6. Are hockey skates and figure skates sharpened differently?
The short answer
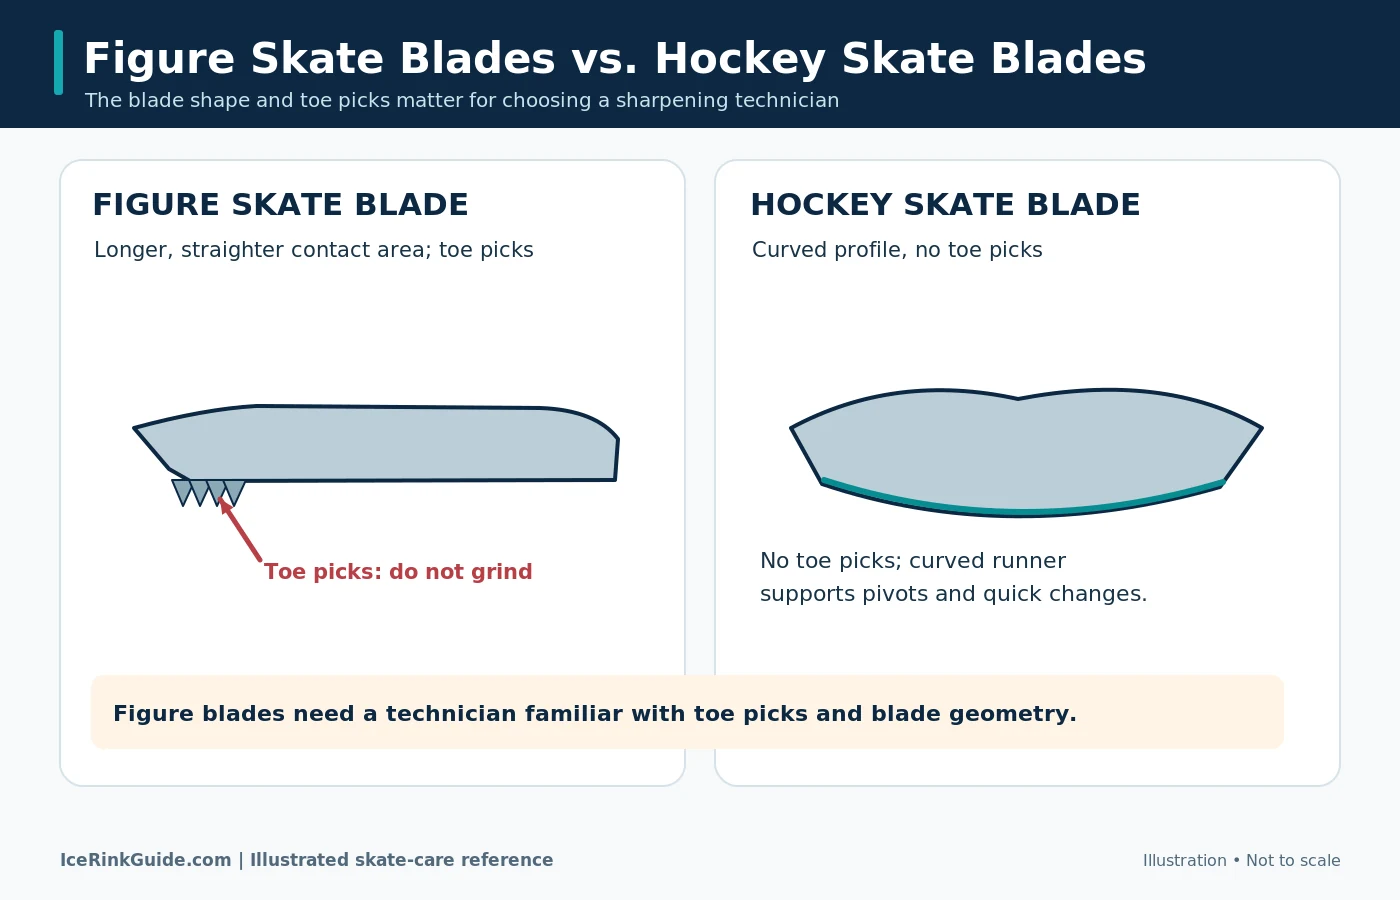
Yes. Figure skates have a toe pick and a longer, flatter blade, and they need a sharpener who works with figure skates regularly. The toe pick must not be ground down during a standard sharpening pass, and the rocker must be preserved. Hockey skates have no toe pick and a more curved rocker. Do not treat the two identically.
The key differences
| Hockey | Figure | |
|---|---|---|
| Blade | Shorter, more curved rocker, no toe pick | Longer, flatter blade, toe pick (serrated teeth at the front) |
| Typical hollow start | 1/2"–5/8" | 7/16" (1/2" beginners, 3/8" advanced) |
| Main risk in sharpening | Dull or uneven edges, lost edge | Rounding the toe pick; altering the rocker; too-deep hollow on a thin blade |
Toe-pick caution
This is the most important difference. The Mad Spinner explains that toe picks should not be sharpened during a standard sharpening pass: a technician who runs the grinding wheel too far toward the front of the blade can round out the toe pick, which kills the grip needed for takeoffs and toe steps. A good sharpener works through the middle section of the blade and stops well before the toe pick.
A poor figure sharpening can damage the skate blade, rounding out the toe pick or altering the rocker, and can take multiple sharpenings to fix, if it can be corrected at all.
Blade thickness
Figure blades vary a lot in thickness by level — thin entry-level blades versus thicker advanced blades. A thinner blade cannot support as deep a hollow as a thicker one without the edges becoming fragile and prone to chipping. A technician who does not measure or know your blade's thickness before selecting a hollow depth is just guessing. (The Mad Spinner.)
Choose the right sharpener
Adults Skate Too advises looking for someone who sharpens figure skates regularly, because figure blades have toe picks and a curved rocker and are not set up the same way as hockey skates.
Before handing skates over, ask: Do you regularly sharpen figure skates? What hollow do you recommend for my level? Do you keep records of my hollow? Red flags: no question about hollow, a generic wheel with no adjustment, or sharpening past the toe pick. (The Mad Spinner.)
One machine note: Sparx can sharpen most traditional flat-sided figure blades with a figure adapter, but Sparx notes it is not compatible with the multiple-piece blades often used in competitive skating. Some figure-skating sources advise against generic automatic rink machines for figure skates; treat that as opinion from a single secondary source, not a manufacturer rule.
7. What do professional sharpening machines do?
The short answer
A sharpening machine grinds the hollow back into the blade, makes the two edges level, and removes nicks, rust, and damaged steel. Hand tools cannot do any of those things. That is the difference between professional sharpening and home maintenance.
What a machine does
A machine grinds the blade with a dressed wheel or ring. The wheel face is shaped (dressed) to the chosen hollow radius, then the blade is passed over it. This removes steel from the centre of the blade to recreate two level edges, restore the hollow, and grind away nicks, rust spots, and burrs. For stubborn damage, a technician may cross-grind first.
Only a machine, in competent hands, can:
- Restore the hollow to a specified radius.
- Level the two edges so they are the same height along the whole blade.
- Remove damage — nicks, rust, and flat or lost sections — by removing steel.
Why hand maintenance is different
Hand stones, strops, and polishing tools work on the surface of the edge. They can remove a burr or smooth a small nick. They cannot grind a new hollow, make uneven edges level, or remove deep damage. See Sections 8 and 9 for what home tools can and cannot do.
Manual versus automated sharpening
Automated systems (Bauer PROSHARP, Sparx) claim more consistent pressure, pace, and blade height from skate to skate, and better preservation of the blade profile, compared with manual sharpening — where pace and pressure vary. Bauer claims manual sharpening can alter a profile in as little as one sharpening; Sparx makes a parallel claim that its system holds the profile throughout the life of the steel, versus manual sharpening altering it after 15–20 sharpenings.
These are manufacturer claims for their own machines. They are not independently verified, and the research for this guide found no controlled comparison of manual versus automated sharpening. A skilled manual sharpener is still the norm in many pro shops. Do not present automated sharpening as proven superior. What matters most is the skill of the person doing the work and whether they understand your skates, your hollow, and (for figure skates) your toe pick and rocker.
Profiling machines are a separate class: they reshape the rocker using templates, gauges, and contour bars. (Blademaster.)
8. What can I safely do at home without a sharpening machine?
The short answer
You can deburr lightly, dry your blades, and inspect them. You cannot sharpen them. Drying and guarding are the highest-value home habits.
Safe at home
- Deburring and light edge cleanup. One light pass with a honing or deburring stone held flat against the blade face can remove a burr or smooth a small nick. See Section 9 for the exact method and its limits. As The Mad Spinner notes, a honing stone will not reshape the blade's hollow or change the radius, but it can smooth minor burrs left by rough ice.
- Drying and rust prevention. Towel-dry blades, holders, and the mounting area after every session. Wipe again after condensation forms. Use soft soakers once the blade is dry. Air out boots. (See Sections 11 and 13.)
- Inspection. Look and feel for nicks, burrs, rust, loose screws or blade movement, cracked guards, and frayed laces. Check guards for grit — grit inside a guard grinds edges.
- Guard and soaker hygiene. Wash soakers and towels occasionally; replace them when they stop absorbing; clean grit out of hard guards.
Not safe or not effective at home without training and equipment
Do not attempt to grind a new hollow, level uneven edges, remove deep nicks, rust, or pitting, fix a bent blade, or change the profile or rocker at home. Those need a machine and a trained technician. Jackson Ultima advises having skates sharpened by an expert; Riedell advises having blades sharpened regularly by a trained skate technician.
Handheld "sharpening" gadgets that claim to re-edge a blade cannot create a true hollow, can make edges uneven, and at best function as expensive deburring stones. Forum and technician consensus in our research is that they do not truly sharpen. Treat that as forum consensus, not a controlled test — but do not rely on such gadgets when blades are genuinely dull.
9. Honing stones, deburring stones, rubber stones, leather strops, and polishing tools
The short answer
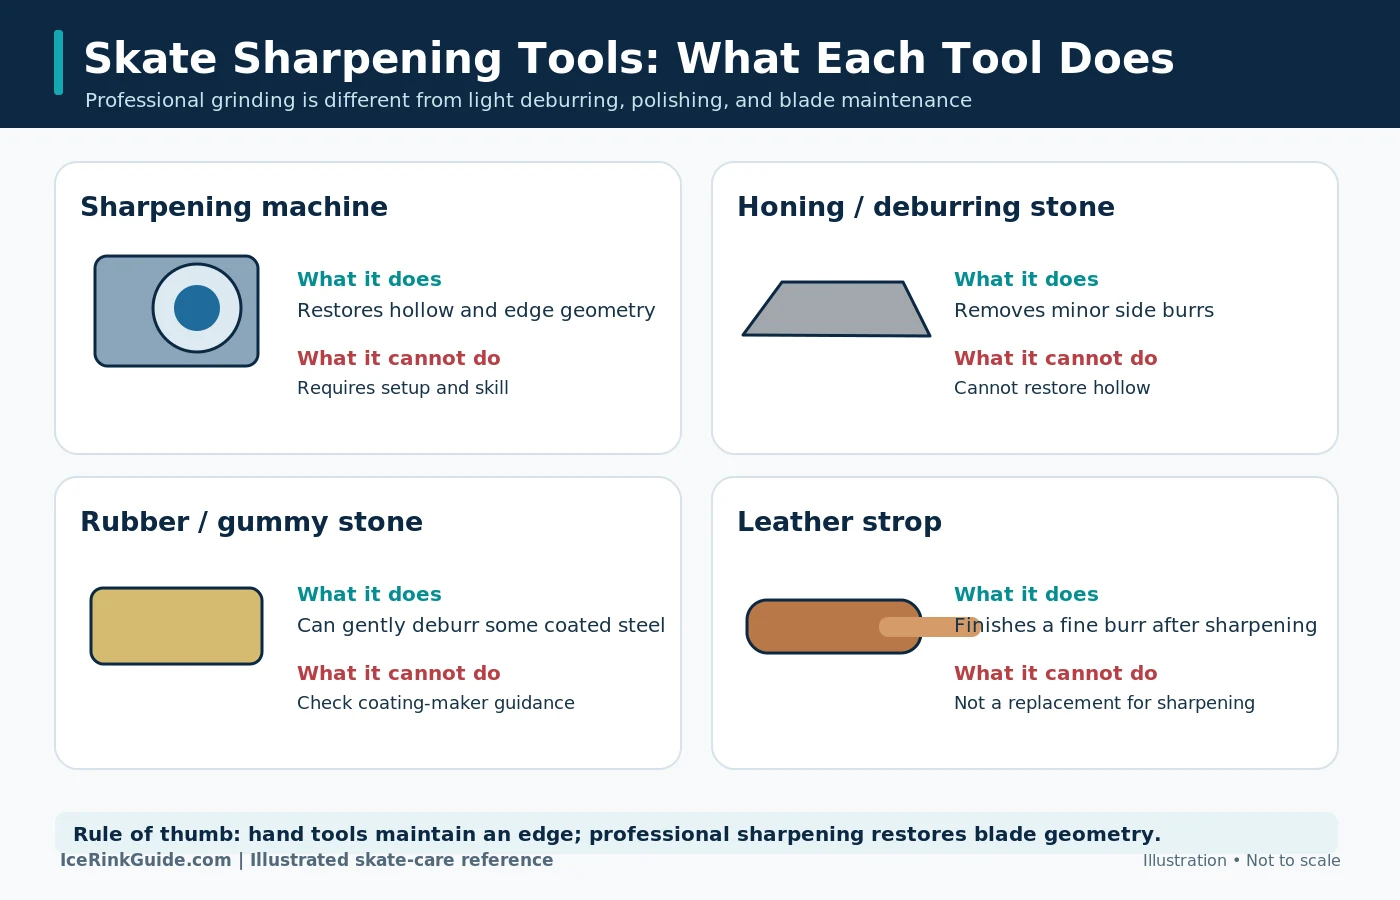
These tools maintain an edge between sharpenings; none of them sharpens a skate. A honing stone removes burrs. A rubber stone does the same on coated steel without scratching the coating. A leather strop finishes the edge. A polishing tool buffs the hollow but does not sharpen. Used heavily or incorrectly, they can make an edge worse.
A deburring stone can remove minor burrs. It cannot recreate the hollow, and it cannot reliably correct uneven blade edges. Only a sharpening machine can do those things. Keep that distinction clear whenever you use a stone.
Tool by tool
| Tool | What it DOES | What it does NOT do | Cautions |
|---|---|---|---|
| Honing / deburring stone (fine, flat, rectangular) | Removes the burr left by grinding and smooths small nicks on the side of the blade. Sparx method: press the stone flat against the blade face, do not put pressure on the side of the stone closest to the blade edge, light pressure, slowly run back and forth along the blade for four full passes, repeat on the other side; wear protective gloves. | Does not sharpen. Does not restore or create a hollow. Does not level edges. Does not fix deep damage. | Hard or repeated passes fold or roll the edge, making it more vulnerable to folding off or breaking. "If one light pass is good, 10 firm passes must be better" is the common mistake. Use light pressure and few passes. Angling the stone can remove bite. |
| Rubber / rubberized ("gummy") stone | Deburrs coated steel without scratching the coating. Same light, flat, few-pass idea. | Does not sharpen or restore a hollow. | Use this — not a traditional stone — on coated (black, chrome, or coloured) steel. Sparx Help advises using a rubberized stone and a leather strop to deburr coated steel, since a traditional honing stone will scratch the coating. Bauer ProSharp's manual says the same: for coated steel, use only the specified combi hone on the porcelain side or a gummi hone, to avoid removing or damaging the coating. |
| Leather strop | Polishes and finishes the edge after the stone; removes the last fine burr. Sparx method: press the strop against the edge at a 45° angle, light pressure, slowly run back and forth for four full passes per side. | Does not sharpen. Does not restore a hollow. Does not remove deep damage. | Light pressure only. Stropping is a finishing step, not a substitute for sharpening. |
| Polishing tools (e.g. Wissota SPEED SKATE) | Buffs and polishes the bottom (hollow surface) of the blade, removing poor finish or roughness from skating or a poor sharpening, without dulling the edges. About 25 strokes back and forth with water as lubricant, best used after sharpening. | Not a skate sharpening device (Wissota). Does not create or restore a hollow or an edge. | Use after sharpening, not instead of it. |
| "Sweet stick" / "magic stick" / snake-tongue honing tools | Marketed as between-sharpening edge refreshers. In practice they deburr or roll the outside edge, which can feel like more bite for a session or two. | Do not truly sharpen. Do not restore a hollow. Can make edges uneven and more brittle with repeated use. | Emergency or one-light-pass use only, per forum and technician advice. Repeated firm use is the reported failure mode. Do not rely on them when blades are "completely shot." |
Cautions for figure blades
A stone used carelessly near the toe pick or at an angle can round the pick or alter the edge. Figure blades are often thinner and their edges more fragile. If you are unsure, ask your sharpener what they recommend for home deburring of that specific blade. No source we found gives a figure-specific home-stone protocol; this is a gap, and the general stone cautions above plus the toe-pick and thickness warnings in Section 6 are the closest supported guidance.
Improper abrasive use
Do not use steel wool or sandpaper on blades to remove rust. Adults Skate Too advises asking your sharpener how they would like you to handle rust, rather than using steel wool or sandpaper, which can damage the edge. Do not use a coarse stone on coated steel — it strips the coating, shortens blade life, and can cause more nicks. Do not use any abrasive inside the hollow (rather than flat on the side); that damages the hollow and the edges.
10. How do I maintain blades between sharpenings?
The short answer
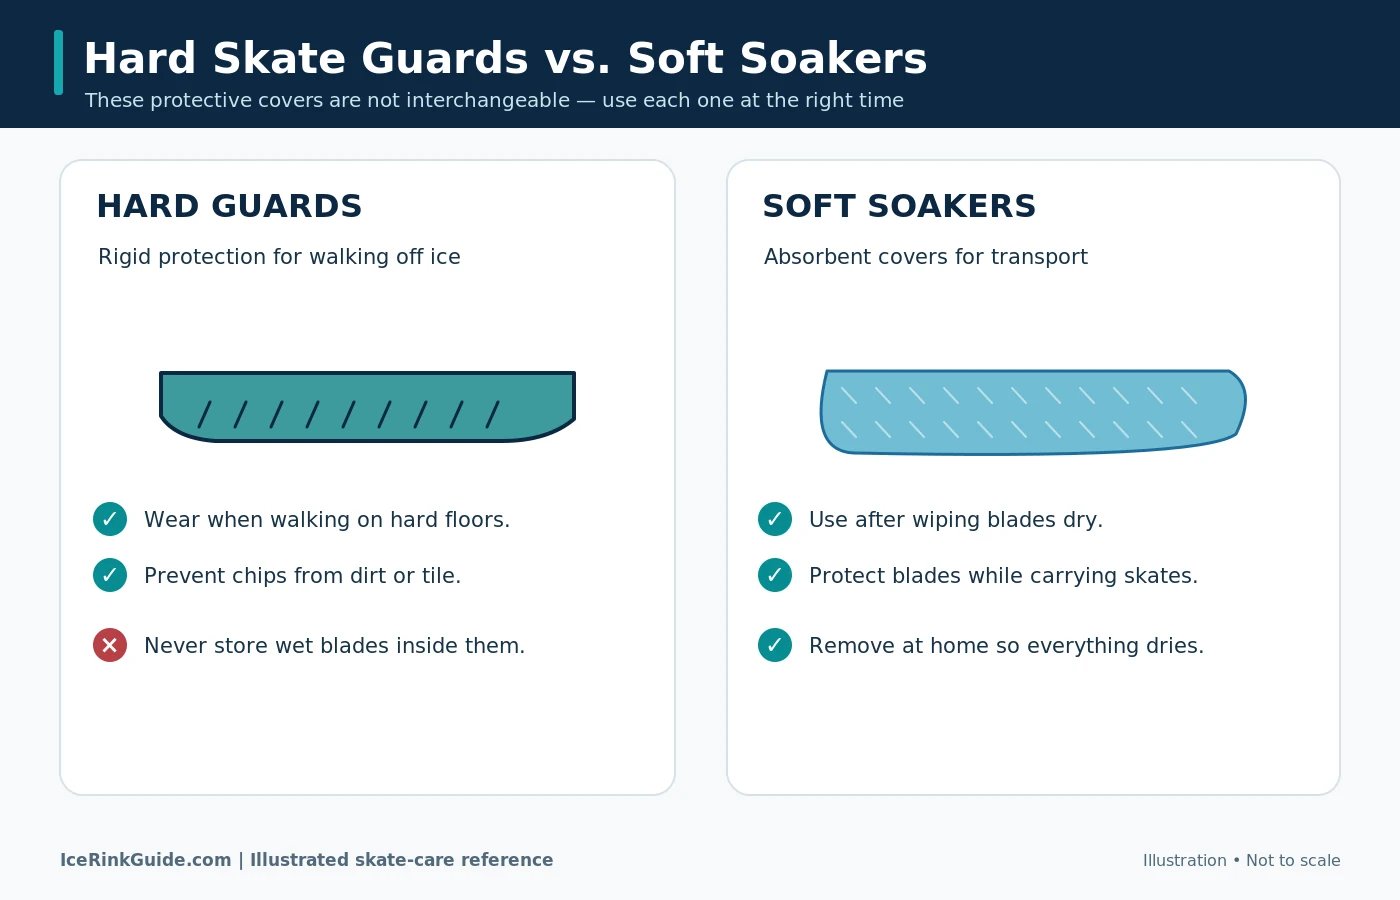
Check your edges before every skate, remove minor burrs lightly, and protect the blades from hard surfaces. Hard guards are for walking; soft soakers are for storage after drying. Never store skates in hard guards.
Check before every skate
Sparx advises checking your edges for damage or dullness before every skate. Look for nicks, burrs, rust, and flattening. Use the fingernail test on any suspect spot (Section 2).
Remove minor burrs
Use a light deburring-stone pass as described in Section 9 — flat on the side of the blade, light pressure, few passes. Re-check with a fingernail. If the burr or nick persists, or the edge still slips on the ice, the blade needs a machine sharpening. Remember: a stone removes a burr; it does not restore a hollow or level uneven edges.
Avoid hard-surface damage
Never walk on concrete, tile, rubber flooring with grit, or bare floors without hard guards. Put guards on the moment you step off the ice. Learn to Skate USA warns never to walk on hard surfaces or concrete with uncovered blades, as it will ruin them. Jackson Ultima notes that even a rubber floor can carry stones and dirt that threaten blades. Keep blades from knocking together in the bag (soakers on, skates packed so they cannot rattle).
Hard guards versus soft soakers
This is the core distinction:
- Hard (plastic) guards are for walking only — from the ice to the bench or locker room, and across hard floors.
- Soft soakers (terry cloth or microfibre sleeves) are for storage and transport, after drying.
Never store skates in hard guards. Hard guards hold moisture against the blade and cause rust. (See Section 11.)
Keep a log
Keep a simple log of hours skated and sharpenings. It helps you learn your own pattern — how long your edges last, and which hollow suits you. (The Mad Spinner; Adults Skate Too.)
11. How do I dry blades and prevent rust?
The short answer
Wipe the blade and the mounting area dry after every session, wipe again after a few minutes when condensation forms, put soft soakers on only once the blade is dry, and take the skates out of the bag at home so they can finish drying in the air. Never store skates in hard guards or a sealed bag, and never leave them wet in a bag.
Drying is the highest-value habit in this guide. It is unanimous across manufacturers (Riedell, Jackson Ultima) and independent care guides.
The drying routine
- Stepping off the ice: wipe ice shavings and snow off the blade. Put hard guards on for the walk to the bench or locker room.
- Once seated and skates off: remove the hard guards. Wipe the blade and the mounting surfaces and around the screws dry with a smooth, absorbent cloth or towel. Moisture here rusts screws and rots boot leather. Riedell advises wiping the blades and mounting surfaces dry, which prevents screws from rusting and boot leather from rotting.
- Wipe again after a couple of minutes. Cold blades pick up condensation as they warm to room temperature. Riedell advises wiping blades again after a couple of minutes, because condensation forms as the blades return to room temperature.
- Soakers on for the bag — only once the blade is dry. Riedell notes soakers help draw off remaining moisture and protect blade edges inside the bag, and absorb condensation as blades warm.
- At home: take the skates out of the bag. Slip the soakers off so the blades can finish drying, re-wipe if wet, and leave them in air at room temperature. Do not leave damp soakers on for days — a damp soaker can itself cause rust.
Never do this
- Store skates in hard guards. Riedell warns that hard guards hold moisture against the blade's metal surface and can cause rust damage. Adults Skate Too advises never storing blades in hard guards or a sealed plastic bag.
- Leave skates wet in a zipped bag overnight. That is how rust and the familiar skate-bag smell get started. (Adults Skate Too.)
- Store skates in a hot car, garage, attic, or damp place.
If rust appears
Rust is usually orange or brown spots along the edge or near screws, and it usually means a blade went into the bag wet or spent time in hard guards. Light surface rust can sometimes be cleaned — ask your sharpener how. Do not use steel wool or sandpaper. A chipped or badly rusted edge needs a sharpener.
A note on oil
A light coat of oil on the edge can help prevent surface rust on carbon-steel blades during long-term storage (Riedell). Some skaters wipe a thin coat on before a long break — ask your sharpener first. Oil is not needed for everyday care. Adults Skate Too notes that for everyday care you need only a towel and soakers, nothing on the blades. Do not present oil or WD-40 as routine care; no manufacturer source recommends it routinely.
12. How do I clean skate boots and control odor?
The short answer
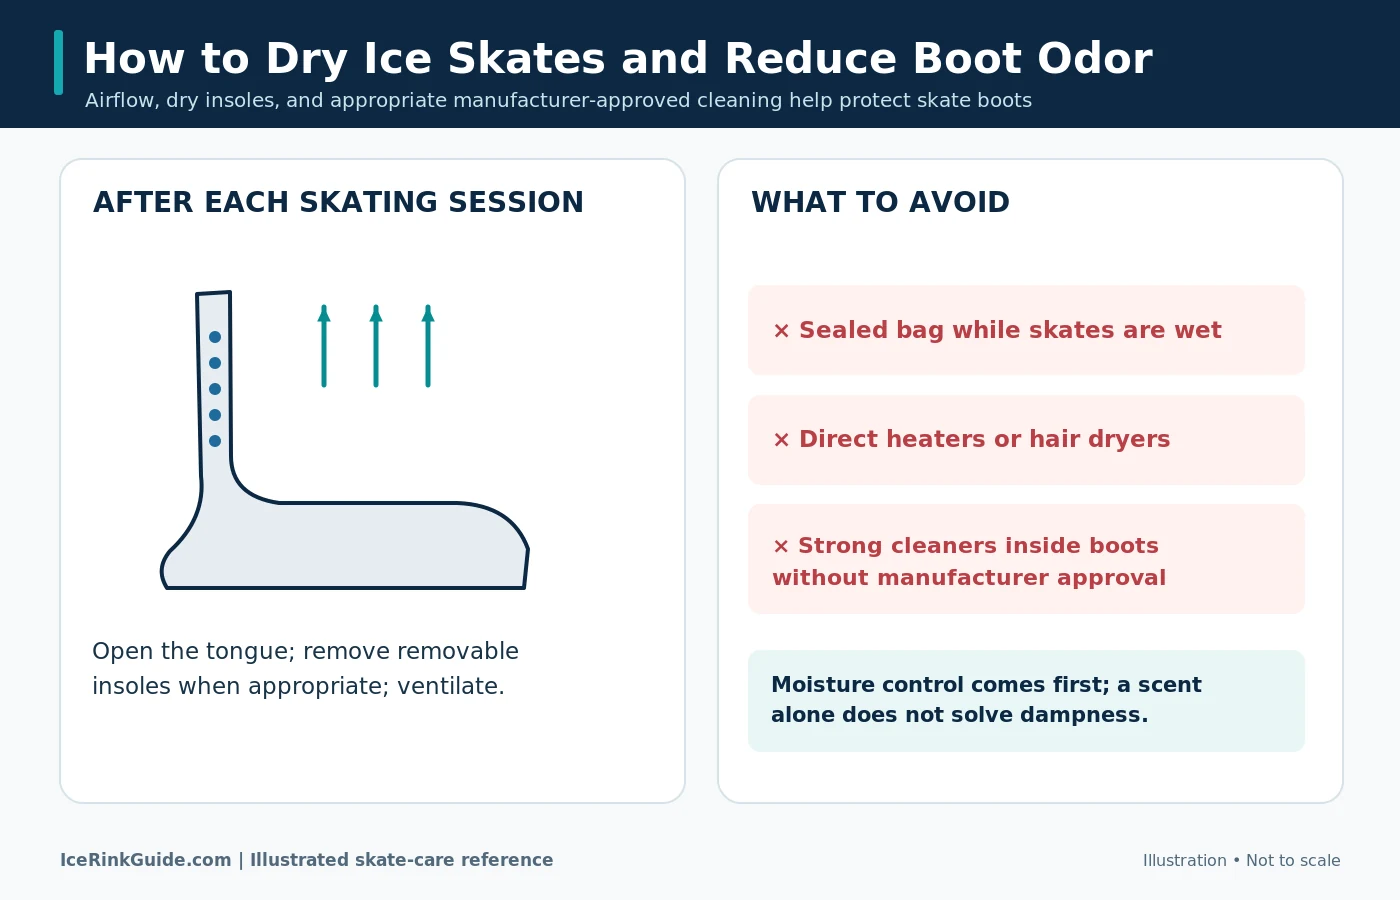
Dry the boots thoroughly after every session — unlace them, pull the tongue forward, take the insoles out, and let them air-dry at room temperature. That dryness is the main defence against odor. For smell that remains after drying, a baking-soda sachet or crumpled newspaper left inside overnight is commonly suggested. Follow the boot maker's care instructions for the material, and do not use heat, do not submerge the skates, and do not use vinegar or alcohol inside the boot unless the boot manufacturer specifically approves it.
Confidence note: No manufacturer source we found gives a detailed odor-removal protocol. Riedell and Jackson Ultima cover moisture and bacteria prevention; the specific remedies below (baking soda, newspaper) come from secondary blogs and are flagged as commonly suggested, not manufacturer-verified.
Drying the boots
Boots — especially leather — hold a lot of moisture. Riedell notes a boot can hold up to a pound of moisture, and moisture plus bacteria from feet cause mould, mildew, and rotting if not dealt with promptly.
After every session:
- Wipe the boots inside and out.
- Unlace fully and pull the tongue forward.
- Take the insoles or footbeds out if they lift out easily, so sweat trapped under the footbed can evaporate.
- Let the boots dry at room temperature before putting them back in the bag. Jackson Ultima: take skates fully out of the bag in a dry, cool room, remove covers and insoles, and allow them to dry overnight.
Keep boots away from radiators, heaters, and hair dryers. Heat can reshape boots (many are heat-mouldable) and weaken glue. Do not leave skates in a hot or freezing car. (Adults Skate Too.)
Leather and material care
Wipe leather with a damp cloth when dirty. Use conditioner, polish, or waterproofing only as the maker instructs, or after asking a fitter. Adults Skate Too warns that the wrong product, or too much of it, can soften a boot and reduce its support. Riedell's system uses a silicone protectant for moisture, a leather conditioner to keep leather soft and supple, and a heel and sole enamel for waterproofing cork. Follow your boot maker's instructions for your specific boot material.
Laces
Check laces for fraying and tears, and replace them before they snap. Keep spares. Dirty or smelly laces can be washed separately — a mild detergent soak or machine-wash in a mesh bag is suggested in secondary sources. For choosing the right size and lacing up correctly, see How to Choose and Lace Ice Skates.
Odor control — what to put inside, and what to avoid
Prevention comes first: dryness and airflow are the main defence. Remove insoles after every use so sweat trapped under the footbed can evaporate.
Commonly suggested (secondary sources; present as such, not as proven):
- A baking-soda sachet — baking soda in a small mesh bag or old sock, left inside the dry boot overnight, then removed.
- Crumpled plain newspaper stuffed inside overnight to absorb moisture.
- Cedar chips or sachets, which absorb moisture and add scent.
- Dryer sheets inside the boot are also suggested in secondary sources, but note that they mask odor rather than removing bacteria.
What to avoid:
- Do not use vinegar or alcohol inside the boot as a general cleaning method unless the boot manufacturer specifically approves it for your boot material. Dilutions in secondary sources vary widely, and these products can damage boot materials. Emphasize ventilation, moisture removal, and care appropriate to the boot material instead.
- Do not submerge skates in water or machine-wash them. That damages leather, corrodes blades, and weakens structure.
- Do not use a tumble dryer, direct heat, or a hair dryer on boots.
- Do not rely on scented spray alone. Secondary sources note that spraying masks smell while bacteria remain.
- Do not freeze skates to remove odor. Freezing is suggested in one secondary source, but it is not verified and is not recommended here; no manufacturer source supports it.
- Do not leave damp soakers or towels in the bag, and do not store skates sealed or wet.
If odor persists when the boot is fully dry, the smell is embedded in the lining or insoles. Consider replacing the insoles and asking a skate shop or fitter, rather than using stronger chemicals.
13. A simple 5-minute after-skating routine
The short answer
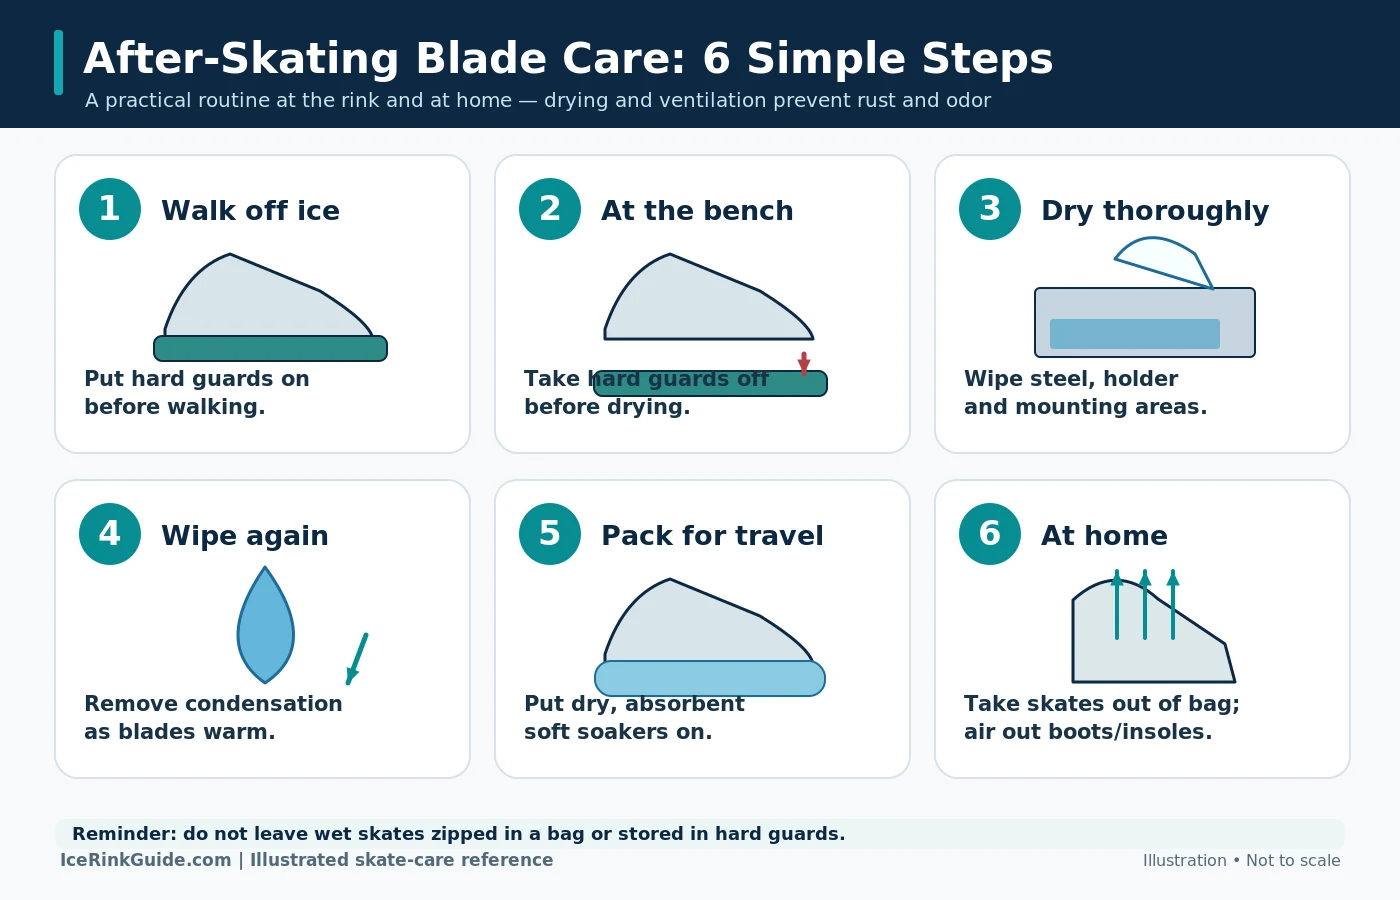
Remove the hard guards, wipe the blades, dry the holders, put on soft soakers, and air out the boots. Do it at the rink, then finish it at home. Five minutes now saves you a sharpening and a rust problem later.
Note: This routine combines the Riedell, Jackson Ultima, and Adults Skate Too steps, sequenced to fit about five minutes at the rink plus a minute at home.
At the rink or bench (about 3–4 minutes)
- (0:00) Step off the ice. Put hard guards on immediately. Walk to the bench.
- (0:30) Guards off, skates off. Towel-dry each blade — both sides, the bottom edge, the toe pick, and around the screws and mounting area. Wipe the boot exterior and the sole.
- (1:30) Loosen the laces fully, pull the tongue forward. If the insoles lift out easily, pull them out.
- (2:00) Put dry soft soakers on the dry blades. Pack the skates so the blades cannot knock together. Keep the guards in the same pocket each time.
- (2:30) Leave the towel and soakers to air if damp. Do not zip wet skates into a sealed bag.
At home (about 1–2 minutes, then leave to air)
- Take the skates out of the bag. Slip the soakers off, re-wipe the blades if condensation has formed, and leave the blades uncovered or with clean, dry soakers once fully dry.
- Leave the boots open — laces loose, tongue forward, insoles out beside them — at room temperature, away from radiators and heaters, with air around them. Leave them overnight before the next session.
- Quick check (weekly, not daily): screws tight, no rust or nicks, guards crack-free and grit-free, soakers and towel still absorbent, laces not fraying.
FAQ
How do I know if my ice skates are dull? On the ice: you slip in turns and stops, your edges wash out, or you cannot hold an edge. Off the ice: you see nicks or rust, or your fingernail slides across the edge instead of catching, or the edge is visible and reflective. See Sections 1 and 2.
How often should I sharpen my skates? There is no single number. Competitive hockey players may sharpen every 2–3 hours on the ice; recreational skaters and many figure skaters may go 20–40 hours. Count your hours, watch for slipping and washing out, and ask your sharpener or coach. See Section 3 for the full ranges.
Can I sharpen skates at home? You can deburr and maintain blades at home, but you cannot truly sharpen them without a machine. A deburring stone removes minor burrs; it does not restore the hollow or level uneven edges. Only a sharpening machine does that. Handheld "sharpeners" do not truly sharpen. See Sections 7, 8, and 9.
What does 1/2 inch hollow mean? It is the radius of hollow (ROH) — the size of the concave groove ground into the bottom of the blade. 1/2" is a balanced, common starting point. A smaller number (3/8") means a deeper hollow with more grip and less glide; a larger number (5/8") means a shallower hollow with more glide and less grip. See Section 4.
Are hockey skates and figure skates sharpened differently? Yes. Figure skates have a toe pick that must not be ground down, a longer and flatter blade, and a rocker that must be preserved. Use a sharpener who works with figure skates regularly. See Section 6.
What should skate blades feel like when they're sharp? Two clean, level, burr-free edges. A fingernail may lightly catch on a sharp edge, but the test is not definitive — burrs and other blade conditions can affect the result; a nail that slides smoothly suggests the edge is dull. A perfectly sharpened edge is almost invisible; a dull edge is visible and reflective. See Section 2.
Can I test skate sharpness with my finger? Do not test sharpness with bare fingertips. Use the fingernail-across test and visual inspection instead — they are safer and more reliable. When in doubt, let a professional evaluate the edge. See Section 2.
Why do my skates feel slippery even after sharpening? Slipping right after a sharpening usually means the edge is not right for you. The most common causes are uneven edges (one edge higher than the other), a damaged edge (a nick or a rolled burr left on the blade), or a hollow that does not suit you (too shallow for your weight and skating style, so the edges cannot bite). A fresh edge can also feel stiff or overly grippy for the first 15–30 minutes as you adjust; that is different from slipping. If the blade feels unsafe — you cannot hold an edge, you wash out on turns and stops, or the edge catches unpredictably — stop skating on it. Do not skate a full session on a blade that feels unsafe. Take the skates back to the sharpener and describe the slipping, or see a different technician. See Sections 1 and 2.
How do I stop my skates from rusting? Dry the blades after every session, wipe them again after condensation forms, put soft soakers on only once the blade is dry, and take the skates out of the bag at home so they can finish drying in the air. Never store skates in hard guards or a sealed bag, and never leave them wet in a bag. See Section 11.
What should I put in my skates to stop the smell? Dry them thoroughly first — insoles out, tongue forward, air at room temperature. Once dry, a baking-soda sachet or crumpled newspaper left inside overnight is commonly suggested. Do not use vinegar or alcohol inside the boot unless the boot manufacturer specifically approves it. Do not mask odor with spray alone, do not use heat, and do not submerge or freeze the skates. If odor persists when the boot is fully dry, consider replacing the insoles. See Section 12.
How long do skate blades last? Every sharpening removes steel, so over-sharpening shortens blade life and can flatten the rocker over time. Sharpen when the signs appear, not on a fixed date. See Section 3.
Sources and Further Reading
- Bauer — Complete Guide to Hockey Skate Sharpening (manufacturer)
- Sparx Hockey — Sharpening 101 and Checking for Sharp Edges (machine maker; use corroborated)
- Riedell — Skate Care 101 (manufacturer)
- Jackson Ultima — How To Care For Your Ice Skates and Learn to Skate: Skaters (manufacturer)
- Blademaster — Skate Hollow Guide and Profiling & Profile Kit (technical supplier)
- Wissota — Choose Your Radius and SPEED SKATE
- Learn to Skate USA — Let's Get Started! (USFS-endorsed beginner care)
- U.S. Figure Skating — Aspire Skater's Guide to Purchasing Skates (factory preparation and initial sharpening)
Additional references
- The Mad Spinner — Ice Skate Sharpening Guide for Figure Skaters (figure-specific guidance)
- Nashville.gov — skate sharpening (public rink)
- Adults Skate Too — Skate Care 101 (care routine, odor, storage)
- First Goal Pro Shop — FAQ (outdoor-ice claim)
- Lumi Outdoors — odor guide (odor remedies)
- Ice Skating Near You — how often to sharpen (recreational frequency)
- Eganville Skating Club — parent resources (learn-to-skate frequency)
Manufacturer recommendations are cited as such; independent advice is distinguished from manufacturer guidance. Where sources disagree — sharpening frequency, the finger test, hollow selection by weight, and manual versus automated sharpening — the disagreement is stated rather than averaged away.